Techniques and tricks: Decoration
In this section I´m going to show you the materials and techniques I use to decorate my models. As always, in many cases the techniques must be practiced repeatedly until obtain the desired results.
The points to discuss in this section are in the menu on the right:
PREPARING THE MODEL THE PAINT: THE PRIMER
If you take a look at some of the "step by step" of the models I've been doing from a plastic body you will realize that in all models I start the same way, removing completely the paint. I do this for two reasons:
- For putties, glues and similar to grab well on plastic
- To prevent paint applied reacts with the original paint of the model and ruin the work.
Once we have the car unpainted and we had did the relevant body work, before starting to paint the slot car we´ll give one or more coats of primer, it will depend on:
- Olny we are going to paint and decorate the car. With one coat we have enough. If we want to ensure that the primer grabs well on the surface, just pass fine sandpaper smoothly through the body and then apply the primer.
- We have modified the body with putty, plasticard and others. We probably have to give more than one coat, the first of which will help us to show the failures that we haven´t detected during the modeling, sandpaper scratches, lack of putty at some points, and things like that. Thus, the primer serves not only to prepare the body to receive the paint, but to match the color of the whole body, highlights the flaws and imperfections of the model that we must repair properly with putty, sanding or as appropriate. After fixing the faults will give other coat, and this way, so many times as necessary (with two or three coats should be enough).
The easiest way is to use a primer spray, Vallejo, Duplicolor, Tamiya or similar type. With a bottle of 400 ml can be applied so many coats of primer and forget to clean the airbrush and other matters.
If you prefer to apply it with a airbrush follow the same advices as for any other paints and if we do it by brush (except for special cases, I don´t recommend it ..) will force us to polish it with waterproof sandpaper to left the surface ready.
Therefore, and in summary about the primer:
- It is essential before painting the model. Equalizes the body color and allows the paint to grip better.
- It can be applied both plastic and resin bodies. At least the ones I´ve used doesn´t attack any of the two types of material.
- It is advisable a previous sandinf of the body after applying the primer with fine grain waterproof sandpaper. The pre-sanding is to avoid the primer jumping on certain plastics. Without going any further, some polystyrene sheets (Evergreen), skip the paint once dry if the surface isn´t sanded previously.
In the resing bodies, pre-sanding is often unavoidable because it is part of treatment of the body to remove mold imperfections. Anyway, it never hurts to pass a smooth fine water sandpaper over the body.
The subsequent sanded is to eliminate flaws in the coat, if we have charged so many primer somewhere or if it has stuck a speck of dust, for example. - Before applying it is important to ensure that the body is perfectly clean. Nothing better than washing with water and few drops of dishwasher to remove all dirt from the body and leave it ready for paint.
- Choose the primer color depending on the color of the car paint. As I said above we can use gray primer and white primer (there are a DupliColor primer that is transparent but I haven´ ever used), if the car you´re building is going to be painted in a light color (yellow, orange, white ...), it is best to use white primer to get a more intense body color, as the gray primer tends to soften the color a little bit. Obviously depends on how much cover the paint we use, but as a general rule for clear colors white, for dark colors gray primer.
- Once applied, let dry completely and give at least one gentle pass with fine sandpaper and/or worn before paint with the chosen color.
A good decoration work starts with a good base, and a properly applied primer will help us to achieve a lasting and beautiful decor.
Go to topPAINT
We can paint our models with spray paints or paint for scale models. The colors in spray are very comfortable to handle and there are many ones to choose from, but they aren´t exactly cheap (I mean the quality ones, of course), they force us to stick to the tones that are on the market and we must be careful with the changes in pressure of the spray as the spray can is running out. Still, it is preferable to use then for certain colors to paints applied with an airbrush, as is the case of the primer or the white color, which usually get better results if use spray that if use the airbrush
They are a good option if we don´t want to complicate a lot, if the colors fit with the decor we want to do and if we have space for use it ... or we don´t care to leave our house dirty...
When I talk about spray paints, I mean specific sprays for scale models, such Tamiya ones, but with this I do not mean that a slot car can not be painted with spray paint that can be found in hardware stores, there are indeed some very good quality, such as the DupliColor brand that can also be used. Without going any further, when I paint the cars white I do it with Duplicolor white spray because covers very well with a very thin coat of paint. I have also used other cheaper paint sprays but the results were pretty bad. Obviously the best quality are more expensive but the price difference is worth it, especially for sensitive applications.
When I talk about paint for scale models I mean the typical tins of paint that we bought at hobby stores. Although we painted the cars with spray always will need to paint the details of the bodywork, interiors, etc... They can be applied both airbrush as paint brush, it will depend on our ability, tastes and what we want to paint.
Of these types of paints for scale models we can find:
- Acrylic. Tamiya Acrylic colors are the ones I most use for its wide variety of tones and colors, that also can be blended seamlessly to get the color you want, because they are easy to find and because I get good results with them. To apply with airbrush I diluted them in 96° alcohol in different concentration depending the color, always trying that the paint has a milky texture that allows a seamless exit by the nozzle of the airbrush but rather covering the surfaces. From my point of view this is the crux of the matter as the application of this kind of paint with an airbrush. As always, the best is to try different concentrations of paint and alcohol, but usually dark colors can be diluted a little more than light colors without losing coverage power. It also can be diluted with water but with alcohol we get the most beautiful colors, especially the bright ones.
When we apply these colors with the brush can be diluted or not, it will depend on the color and texture you want to achieve.
Although I only talk about Tamiya acrylic colors there are another paint brands in the market but I haven´t used so I can´t say anything about the result they give, but I think most acrylic paints will be similar. - Acrylic-vinyl. I mean Vallejo acrylic colors. These paints are great to detail the bodywork, interiors, bodies of the drivers... I know fans who applied with an airbrush with good results but I haven´t experience with it. I always apply it by brush and diluted with water. The variety of colors is very wide and can be intermixed. If we were wrong to paint something we can fix it without much problem with a cotton swab dampened with water or a toothpick before the paint dries. In short, this are paints ideal for car detailing, window frames, headlights, interior, drivers, etc. because we can make corrections.
- Enamel. The two brands of enamel paint that I used are Humbrol and Tamiya. They can be used instead of acrylic colors, both with brush and airbrush, you can mix with each other to increase the existing wide variety of colors and generally covered very well. Need to be applied with an airbrush less diluted because they are more "fine" that the acrylic paints. Against him are that both its dissolution as cleaning of brushes and airbrush must be with thinner.
To dilute these paints is advisable to use the thinner of the same brand as the paint to avoid strange reactions and unwanted effects. However, for cleaning the enamel paint brushes and airbrush can use any solvent sold in hardware stores and industrial suppliers, they will be much cheaper than the solvents that sell paint manufacturers, and take into account that to clean airbrushes and paint brushes we needed much amount.
The finishing of enamel paints tend to be more fine, but having to use the solvent for cleaning and dissolving makes them more inconvenient to use.
There are many other paint brands, such as acrylic or enamels, which I don´t refer here not because they are worth, simply because I haven´t used and I can not talk about them.
Finally, when paint is important to note:
- Whenever we apply the paint is best to do it a well ventilated and dust free place to avoid breathing a lot of paint and the dust would place in the pieces that we´re painting. Furthermore, the temperature of both the paint and the body is essential if the environment is too cold or too hot the finish would be poor. Ideally, the temperature must be approximately 20 degrees (° C). Besides, if paint (either by tin or spray) is too cold will not be properly applied, to solve the problem, simply put the tins in hot water for a while. In the latter case take care about the temperature of the water for spray cans, as the temperature increases the gas expands, and you would not be the first people who exploits a spray can.
- It is interesting to have a few cans to throw the dirty solvent or alcohol (depending on the paint) so you can use it more times when cleaning brushes. To clean them altogether, we can always take alcohol or solvent on a cloth and wipe the brush carefully. This will save a lot of product.
- When we paint various colors with airbrush is better to paint first the light colored pieces and then the dark colors to avoid having to clean the airbrush many times. When color changes, throw a little alcohol or solvent depending on the type of paint in question to clean up a little and then we fill the cup with the next color. When we finish all the colors of paint we can clean the airbrush thoroughly.
Another way of using paint and for not to have to past all the time cleaning is to prepare all the parts we can, although in several models, to paint the same color and make the most of the paints. - If we paint indoors, although we use a paint cabin or have sufficient ventilation, it isn´t left over to use a mask and even safety goggles (you can find both for about 3 euros in hardware stores) to protect against fumes and suspended paint from airbrushes and spray, our eyes and lungs will thank us.
DECALS
Virtually every slot car we build need some decals to complete the decor. In the simplest cases they will be a small decals for the plate, a shield or a rally plate. At the other end would be make the complete decor with water slide decals. Although we handle the airbrush well, the masking and other tips, simply there are some decorations that we can not do painting on the model. In all these cases we resort to placing water slide decals to decorate the models.
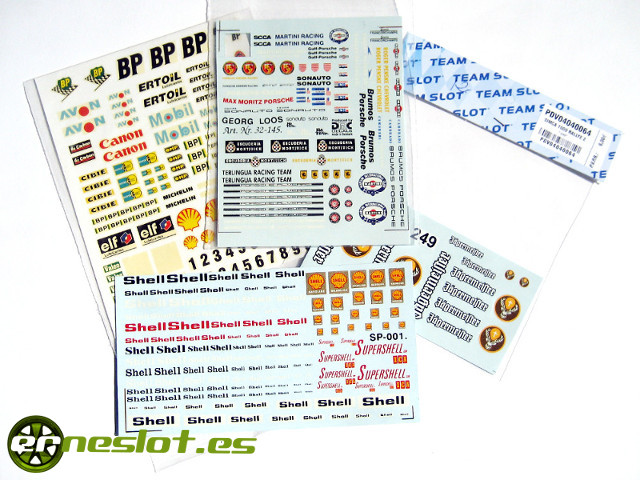
There are plenty of decal manufacturers, both commercial (Virages, IBB, etc ..), as artisans, that can perfectly work, even many resin kit includes a high quality home decals, but there are many cases where the decor we need simply do not exist in the market and we have to do it in decal paper.
To use commercial waterslide decals is a very good option if we do not want to complicate much, the decor is simple or the commercial decals cover our needs. This type of decals tend to be of very good quality, and easy to place, so they are very good choice for the beginner in the hobby.
The commercial decals we can be divided into two types, decal sheets with single logos of different sizes, or sheet with complete decorations. In both cases they ensure satisfactory results. In fact, I use them often when need specific logos and so I avoid to print de decals by myself expecially when I do free decorations. The olny negative aspect I see of this decals is that we are limited to the logos a decor the has and maybe they would not been the ones we exactly need.
Go to topMAKING OF WATERSLIDE DECALS
When we have to decorate a model and we do not have the decals (because they aren´t for sale or because y we do not want to buy them) allways we can make them ourselves. For such cases on hobby shops we can get waterslide decal paper, for inkjet and laser printers, which allow us to make our own decorations with the help of a computer, a vectorial drawing program (Corel Draw or similar) and a printer.
The steps to make our decals would be:
- Get the decal paper. As I mentioned above, the decal paper for printers can be found in hobby stores or on eBay, for example. Papers are of several qualities, some are thicker than others, some decals come more or less clear... I use one similar to that is for sale in the A2M shop, I got it through eBay and is just fine, though I don´t dislike the results.
Within the same quality of paper, we take into account this few things:- There are two types of paper, white and transparent. Because inkjet and laser printers do not print the white colour, we must use white paper every time the decoration includes white parts. Logically, if the background color of the car is white this isn´t necessary. And always keep in mind that the white paper is slightly thinner than the transparent one.
- What type of printer we have. The decal papers are different if they must to be used with an inkjet printer or a laser printer. If you do not want to spoil your printer (especially if is a laser one) we must take this into account when buying the paper.
- Get all the possible information about the decor. Logically, if we want to reproduce a real decoration of a car we need to see several photos of the model in question from all possible angles. For decoration of a road car is not necessary because its decoration is sparse (except for a car tuned...), but for a racing car we need to know the sponsor logos and their placement to reproduce them faithfully. This documentation work can be said that is previous even before start to work over the body so that much of the work is done long before we get involved with the decoration of the car. This will let us to see cleary the car decorating scheme, sponsors, logos and other signs and its right size and placement.
- Draw the decals on the computer. It isn´t absolutely necessary, but if we want to do a good quality decals and as close as possible to the real car will need to use a vector drawing program such as Corel Draw or Adobe Illustrator. Apart from these ones there are other lesser known programs which can serve us, like Creative Docs. NET, which is free or Inkscape, which is free and also very good. The important thing is that the program allows us to make vectorial graphics. A vectorial graphic is an image created from independent geometric objects who have the property of being able to zoom in or out without losing definition and always maintaining the same form. That´s the interesting feature of these types of graphics when making the decals, we can draw a logo and then re-scale it up to whatever size you want without losing quality. On the latter, if we look at a racing car, for example, we can see that in many cases the same logo appears on various parts of the body at different sizes. With a program for creating vectorial graphics we can do the logos we need, and scale to whatever size you want without losing the quality or form in a fast way.
There are also Internet sites that have a large amount of vectorized logos that can be of great help for our decorations because they can be downloaded and we olny have to re-scale them to the desired size, one of the most important for the quantity and quality of logos is www.brandsoftheworld.com but if you seek for sure you´ll find many more. - Adjust the size of the decals to the body. Once we go making the parts of the decoration with our design program, we have to check if they fit neatly in the right place and if the size is adequate. To do this we will print the decals on a plain paper (or even better in a sticker, if you have it) and we will put the decals on the car. So we´ll see if we need to tweak the size, the position of one or the shape of another... In addition, we can see how the colors look, despite the fact that when we print the decals probably change a little bit.
- Printing the decals. Equally or more important than doing the decals in the correct size is to print them. If we use and ordinary printer (laser or inkjet) we realize that can´t print white or metallic colors, so that when we want to print the white color we must use white decal paper and otherwise transparent decal paper. This means that in most cases a unique decoration must be printed in two parts, one on white paper with the corresponding logos and other on transparent paper.
Moreover, when using transparent paper we will consider which is the base color of the car if we want our decorations look the right color. For example, if we print a yellow logo and the base color the car is blue, when we place the decal over the car the logo will be green, not yellow... or, for example, a clear red decal on a green background will be darkened. What I mean by this is that the home made decals (on a normal printer) have their limitations. Ideally, we must test the colors on each decal paper and see what happens when place them, and decide in what paper print.
If we don´t want to print the decals we can take it to a shop where can print them (photocopying or similar), which generally use a laser printer. We´ll take the file with the decals in an image file in the appropriate format with which to work, the white background on one file and the transparent background on another, and in the shop will print them.
Regarding the resolution of the printer, so far with mine (a Canon Pixma i4850) I print in high quality mode and high resolution paper. In some forums I read that some fellow prints in the photo quality. The ideal, as so often, is to test at different resolution and different media types to see the results and choose the best configuration. - Coating of the decals. For the ink on the decals won´t diluted when wet ruining all the work they should be varnished once dry. I usually let it dry at least one day before varnishing, or two if the decals are printed a lot of resolution (and therefore with more ink). When the decals are well dry we can varnish them in different ways:
- With a acrylic varnish spray. It´s the easiest way to varnish. Must be acrylic because it is more delicate with the ink than synthetic vasnishes. Usually two or three thin coats are enough to protect our decals, and letting dry thoroughly on each coat. Like when we paint, it is preferable four fine coats to a highly loaded one.
- Applying varnish by brush. The technique most risky. Risky because not all papers permit to coat with brush without spoilage ink. I´ve tried it on my decals with two types of varnish, "Bosque Verde" wax varnish, and Vallejo satin acrylic varnish. In both cases, despite sliding the brush gently over a very dry ink both varnishes diluted the ink, especially the first (I´m not saying anything new ..). Vallejo varnish is quite respectful with the decal but the results weren´t good. I advise you not to do so.
- Varnish applied with an airbrush. So far I´ve only tested with two types of varnish in this way:
- Vallejo acrylic varnish. Applied undiluted by airbrush doesn´t attack the decals ink, for the airbrush is difficult to throw because it is quite thick, but it covers very well. The problem is that because of its density leaves little bit translucent the transparent decals and especially very thick, so when placed over the car feels much gap between the paint and the decal. To him credit I must say that the decals are indestructible, you can take with your hand, stretch, whatever, and stay fine.
- The "Bosque Verde" varnish applied with an airbrush gives the best result. The first coats must be very light, because otherwise attacks the paint and diluted. I´ve tried with 3 and 4 coats, the last generous but not spend, and three is pretty good, but somewhat delicate when it comes to place them.
Make homemade waterslide decals is neither easy nor difficult, we just have to be a little careful at every step and make tests. Generally the go well at first, but if not, nothing happens. And they come out better on subsequent occasions.
Go to topPLACING WATERSLIDE DECALS
For anyone who has already decorated car models or slot cars with waterslide decals this section hasn´t any interest, but if you haven´t ever do I´m going to explain some steps to place the decals with guarantees.
To decorate a scale car with waterslide decals is a very common thing, itseft is a easy task but we must be careful at some points. Usually, the decals are less delicate than they appear but we must treat them with care. Do not fear, but must be carefull and, especially in complex decorations, be patient. No need to finish decorating the car in an afternoon, but to leave their best.
Before placing the decals will prepare the necessary tools:
- The waterslide decals
- Cutter and scissors
- Flat surface for cut the decals if needed (a flat piece of glass, for example)
- Rule (for straight cuts)
- Clean paintbrush
- Tweezers
- Cotton swabs and paper towels
- A container of warm water
- Microsol and Microset (if necessary)
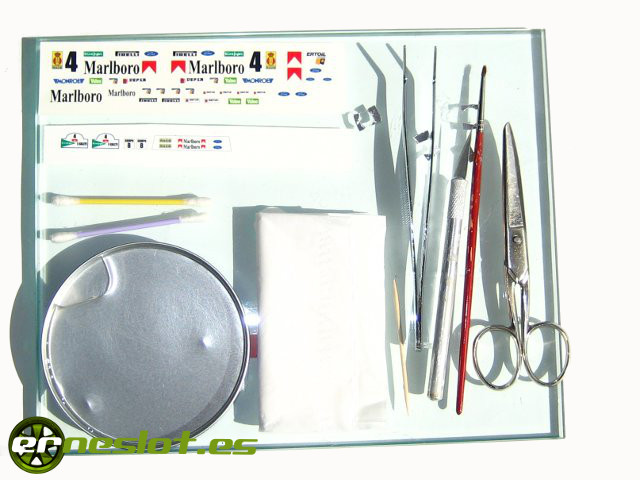
Once we have everything ready we take the body with the paint thoroughly dry. It is advisable to have all the possible documentation about the model to know the exact position of each of the decals. To do it from memory can play us a dirty trick and to place the decals in places where they mustn´t (and I say this from experience).
The decals that we can place may already be cut or be decal sheets (usually homemade) that will be cut. In the second case, we must use a flat as possible surface and a sharp blade for cutting them. If the cuts are straight, a rule will be of great help, if they are curved, we can use sharp scissors. With the decals cutted the steps for place them are:
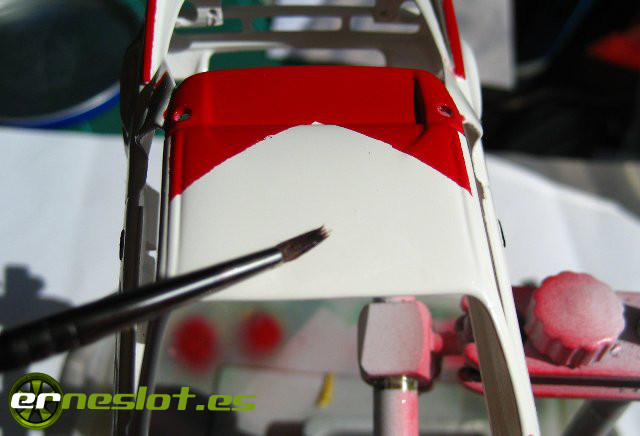
- Moisten the surface where the decal will be placed with water applied with a paint brush. Do not swamp the surface, only moisten it to slip the decal and facilitate its placement.
- Using a tweezers, dip the decal in warm water for a few seconds until wet out. Water hasn´t to be very hot, more cold than hot, but the colder the water is more takes the decal to unstuck from the paper. If the water is in a container that keeps the temperature much better, save much walks for more warm water.
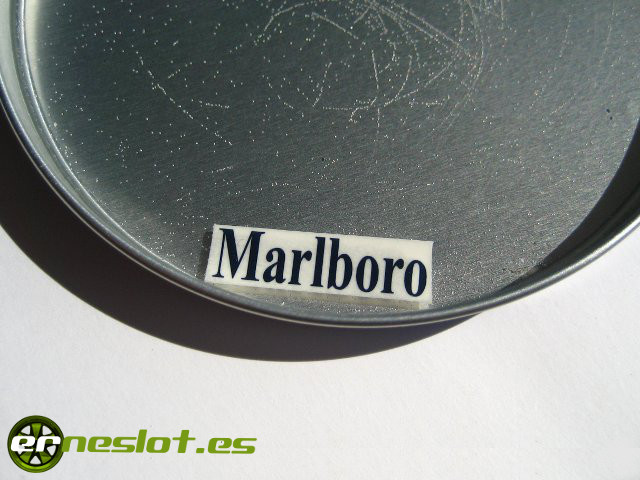
- We take the waterslide decal off the water and leave it on a sponge or paper towel to drain. We found that separates easily from the paper who serve as support. We can do this by touching it with our fingers carefully (if the decals are resistant) or with the paint brush that we have used to moisturize the body.
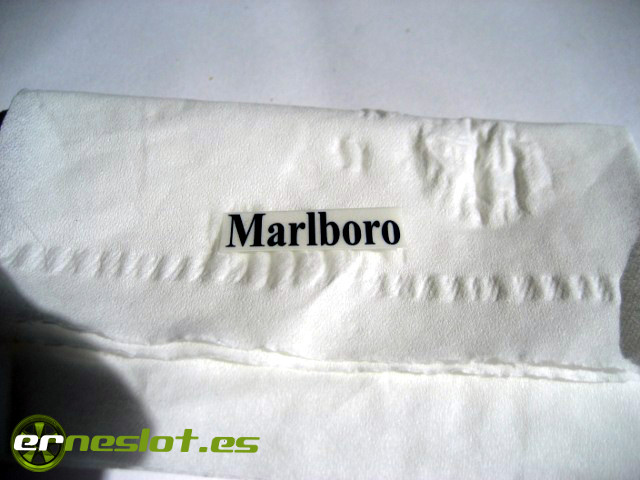
- Over the body, we slip the decal from its support a little. Using the cotton swab or a paint brush we place it on the body while we pull the paper carefully with the tweezers. Thanks to the water with the body is moistened we can move the decal smoothly into its right position with the help of the paint brush or our fingers.
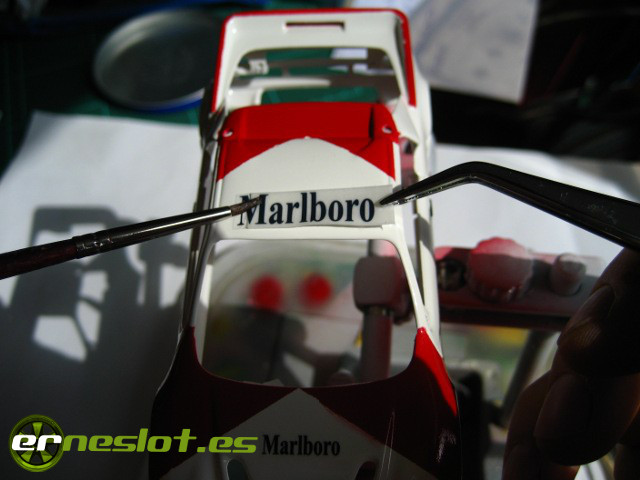
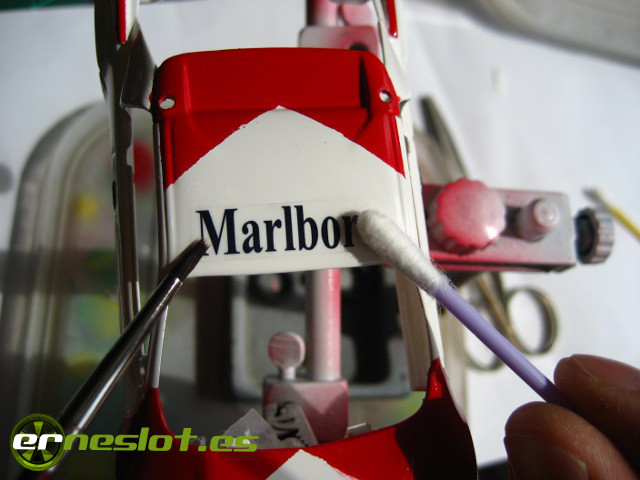
- Once placed, pass the cotton swab as a roller over the decal to remove water that may have become trapped behind and leave it firmly in place. If the decal to place is big, maybe could be a good idea to cut it into smaller pieces before moisten to make it more easy to handle.
- If the surface where we apply the decal is not smooth and we want to fit it well, for example to the slots of a door or the hood, we can use Microsol. Microsol is a solution that softens the decal and allows us to adapt it to a irregular. Logically, it don´t make miracles, there are places when the adaptation is very complicated and is not good, but I have used it in quite complicated places and it worked correctly. If we have a decal that we want to adapt we place it as a normal decal, once set, with a clean paint brush, we wet it with a little bit of Microsol. Maybe the decal cresae a bit maybe not, nothing happens if creased, when dry again will be perfect. We allow to work for a few seconds on the decal and using a cotton swab, a toothpick or any blunt object, we adapt the decal to the surface, for example, we introduced carefully into the slot on a door..., when it is well placed let dry as usually.
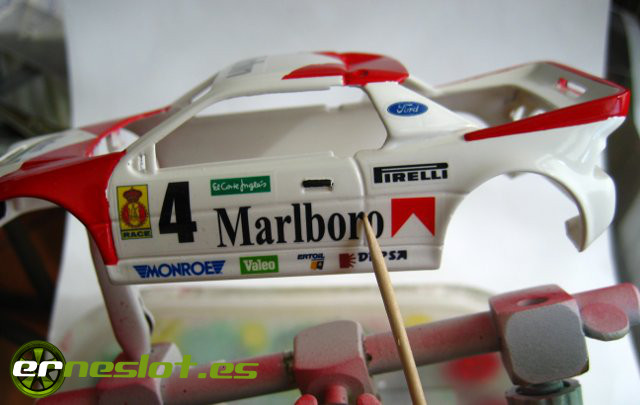
Microsol is a product that works fine, in fact, the limit is not the product but the flexibility of the waterslide decal, which can stretch to some extent. In my experience, the homemade decals are usually more flexible and better able to withstand these deals, I suppose it´s because they are thicker than the commercial ones. - If the decals we are going to place have lost their sticky power because they are old or because we have previously adapted the decals with Microsol, Microset allows us to set them right. The decal is usually placed and when well placed wet a little with Microset applied with a clean paint brush.
If the decal simply not getting stuck, apply a little bit of Microset with a paint brush in the place where the decal will be positioned and then place it over the Microset. Then remove the excesso of liquid with a cotton swab. In both cases it let dry thoroughly before varnishing.
Once all the decals placed, let the body dry well, a day or even two is ideal, especially if we had used the Microset and Microsol, and we can varnish the car.
Therefore, placing waterslyde decals has no mystery, just to be a little careful and have all the materials at hand to do the job well.
Go to topCIRCULAR DECALS: THE COMPASS CUTTER
When we do classic car decorations, the numbers usually are circular with black characters over white background. Maybe our kit includes the waterslide decals or can we take the easy way and buy the numbers, but if we haven´t them, or we want to make them ourselves, the task is quite simple and for which there is a tool that will be of invaluable help: the compass cutter.
The compass cutter is a very simple tool that allows us to cut almost perfect circles on paper, cardboard and even thin plastic. The tool in question is this:
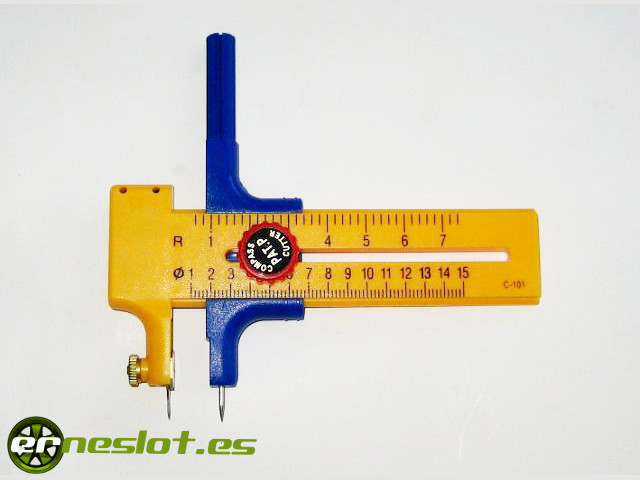
It has two parts, an arm who is the axis of the compass that ends in a pin that would be at the center of the circle (blue piece in the photo), and the other arm of the compass at its end is the cutting blade and that slides over the axis to vary the extent of the radius of the circle to cut (in the example yellow piece of photo).
To use it is very simple, the radius of the circle to cut is the distance between the tip and the cutting blade, once given the distance clench the wheel to stop the two arms of the compass to remain unchanged the radius during cutting. We place the compass tip in the center of the circle to cut and we will turn over its axis trying to maintain it perpendicular to the piece to cut.
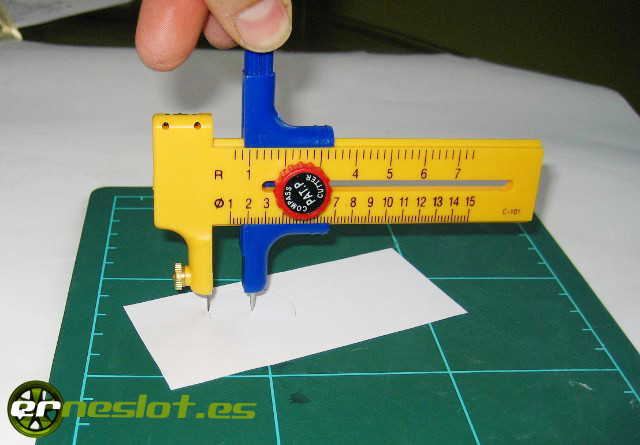
When we give a complete turn on its axis, we cut the piece. Thus, if we do it on a piece of white decal paper, we have a circular number to put in our cars. We need to varnish prior to placement, there is no ink that may damage by water but the paper is so thin that needs the varnish to gain strenght. Otherwise, is very difficult to place once wet.
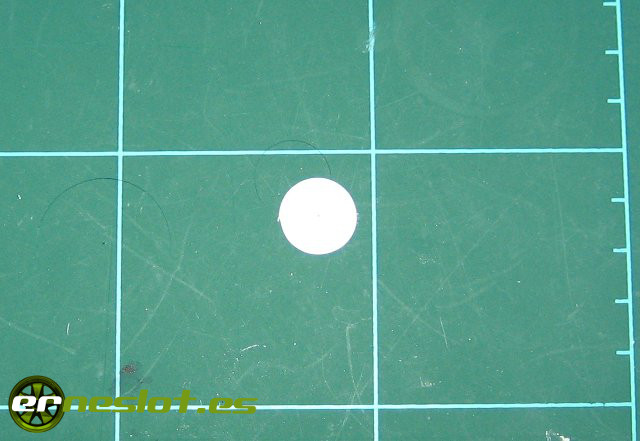
In the case where we want to cut the circular number with a printed number, you may not want to have any edge line, or the center mark or anything, just the circle with the numbers inside, How do we do?. In this case, when I print the decals for the number, in the file I include a few lines that will guide me when cut them. If we draw a line to connect these marks, the crossing point would be the center of the circle, where to place the tip of the compass.
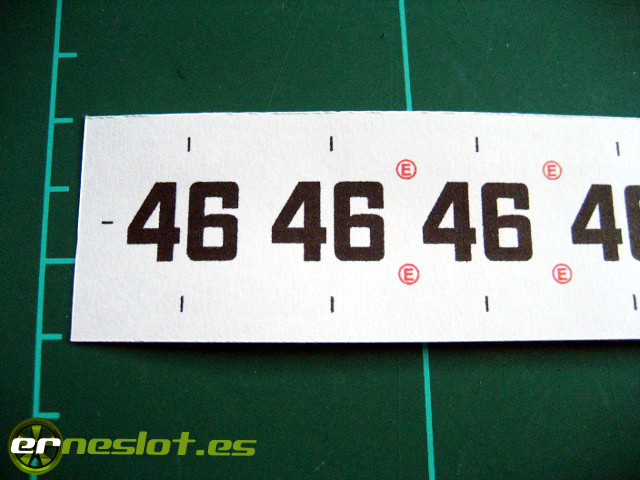
As we will not connect the dots with a line and damaging the decal, we will use a millimeter ruler to locate the center of the circle helping us with the marks on the paper.
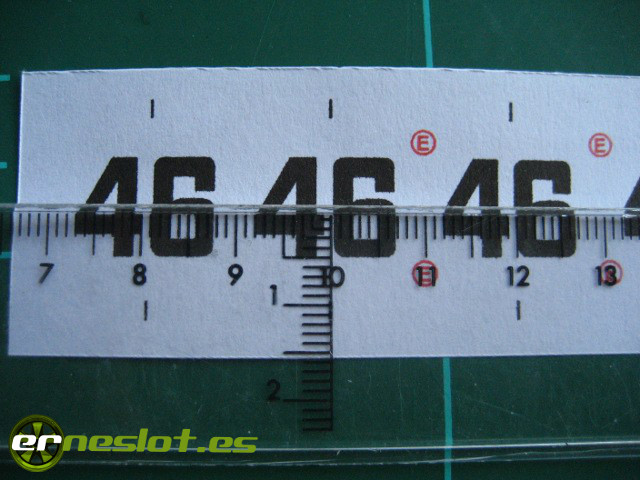
Once the center located, punture the compass needle which we have previously determined the extent of the radius of the circle, trying to be as perpendicular as possible regarding the paper:
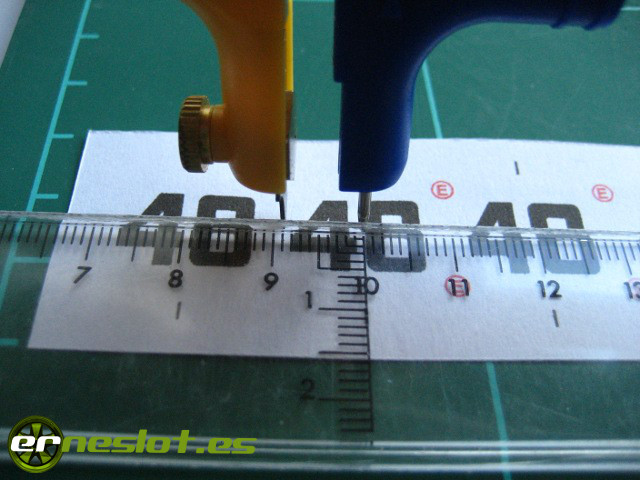
We turn the compass and now we have our circular number with the number inside without any rim. The hole that makes the needle in the center of the decal, if it´s not so big, disappears once the decal placed on the car.
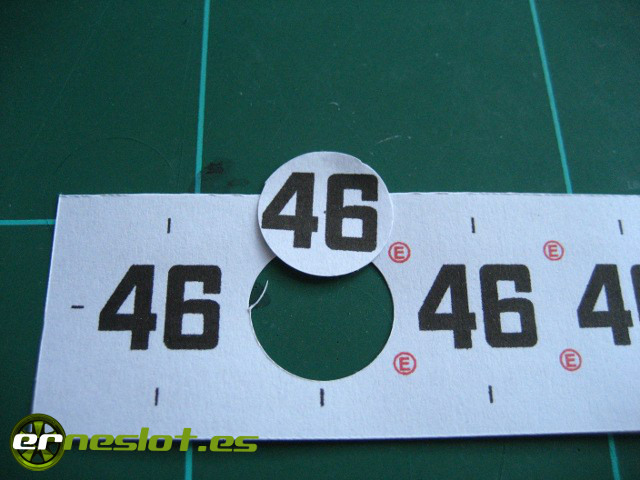
As you can see, the technique is quite simple but to make good circles we must practice a little on some paper to make them perfectly, the ideal is not sink too much the compass needle and ensure that it is as perpendicular as possible regarding the decal paper, as I said above.
In the case of the dorsal with number, the only care that we must take is to position the marks well when we make the decals file, which is quite easy to do with any of the vectorial design software we could use.
VARNISHES
From my point of view, this is the workhorse of the modeller. Countless is the number of good jobs destroyed by the incorrect choice of varnish, either because they attack the decals or painting, or because they shatter or yellow... The fact is that when we apply the varnish we must be very careful because this is the last step in creating our models.
The varnishes can be applied in different ways:
- Spray. The easiest way. Is important to follow the rules of application that indicates the manufacturer, appropriate temperature, shake before using, recommended distance, etc.. Apart from that, we need to be clear about one thing, do not load much each of the coats, better bring a lot thinner than one thick coat which may leave unwanted effects.
- By paint brush. Not all varnishes allow us to apply this way and give good results. Wax varnish "Bosque Verde" and similars and the Vallejo removable acrylic varnish are okay. Is better to pass the paint brush lightly loaded with varnish and must to be careful over the indelible marker because they can drag the ink. Sometimes when varnished this way small bubbles appear over the model surface, but do not represent any problem because disappear without trace as varnish dries.
- With airbrush. Any type of varnish can be applied with an airbrush, but I only use acrylics in this way. Some are thicker than others and if out airbrush isn´t good maybe the result couldn´t be satisfactory. I use to varnish the home made decals with very good results.
- Immersion. My friend Dario from "Unotreintaidos" has painted some body in this way with very satisfactory results. The varnish is poured into a container and the body is immersed in it, extract the body centrifuged to remove excess of varnish. I haven´t tried but it works. At least with the so-called "donkey milk", a varnish like "Bosque Verde", probably the latter behaves the same way.
The varnish I use for my works are of two types, acrylic and synthetic, apart from the "Bosque Verde" wax coating which I´ll talk about later. As a general rule acrylic varnishes are more respectful with the paint and the decals that synthetics, although this is not a general rule, due to the amount of paint types we can use to decorate our models, maybe one could interact badly with some acrylic varnish. Therefore, as advice, before applying varnish always is best to test on another body. Sure in the drawer we have old or broken bodies that can be used as guinea pigs for our tests with the paints, the varnishes, the glues...
After using different types of varnishes, with mixed results, sometimes good, sometimes very bad, I decided to do a battery of tests with different varnishes that I often use to check the results they gave. In this sense, I prepared a square methacrylate plates first painted with a white acrylic spray (Duplicolor) and then over the white painted some orange acrylic paint (made with a mixture of Tamiya colors airbrush applied) and a stripe of black enamel (Humbrol). To test the effect of varnish over the decals, put two numbers on each plate extracted from a old Team Slot decal sheet. Below show an example of a test plate:
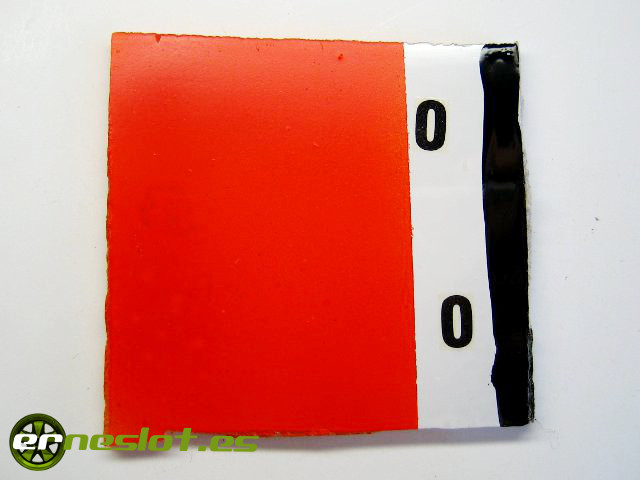
The varnishes that tested were:
- Vallejo acrylic gloss (spray)
- Duplicolor bi-layer gloss (spray)
- Citadel satin varnish (spray)
- Wax Varnish "Bosque Verde"
- Titanlux Acrylic varnish "Acualux"
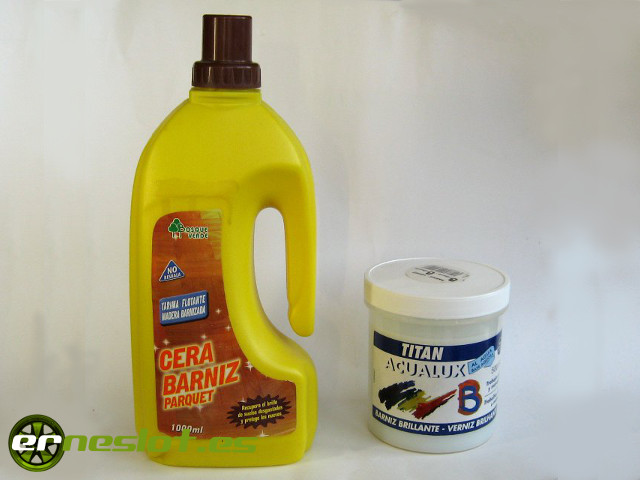
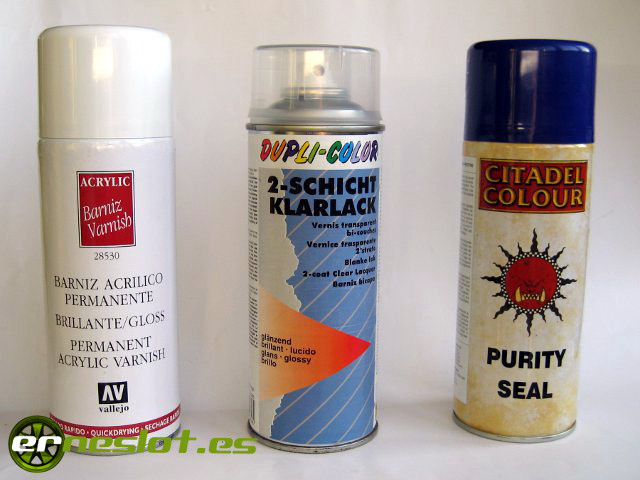
I wanted to test the varnishes to check various aspects:
- Interactions between different types of varnishes
- Effect on the most common paints (acrylic, enamel and acrylic sprays)
- Effect on the waterslide decals
- Hardness and finish
The varnish "Bosque Verde" I´ve used a few times to give the final coat of varnish and other times as a protective layer prior to application of another coating, usually Vallejo acrylic spray. To test the interaction of the coating with the other spray paints, to the first three test plates varnished the upper half with two coats of "Bosque Verde" applied by paint brush, as I usually do in some slot cars. The bottom half left it as it was, olny with paint. Allow to dry thoroughly both hands of "Bosque Verde" and then apply the varnish spray with the following results:
- "Bosque Verde" + Vallejo acrylic spray: The result can be seen in the photo below. Virtually there"s no difference in the finish on the top half of the plate with the bottom half, both varnishes interact well, and the paint has remained in place without problems. The black enamel is not affected at all, nor the acrylics (which is more sensitive) as the cut lines remain well defined and not blurred by the effect of varnish. The decals are not affected in both halves of the plate and the gap between the decal and the surface barely be seen, especially at the top half. In both halves offering protection very resistant to scratches (scraping with a fingernail) and the finish is very good, very sharp. About this, I have to say I didn´t take any particular care to cover the plates after the varnish so dust and other impurities stuck, it can be seen in the photos, but this doesn´t change the results.
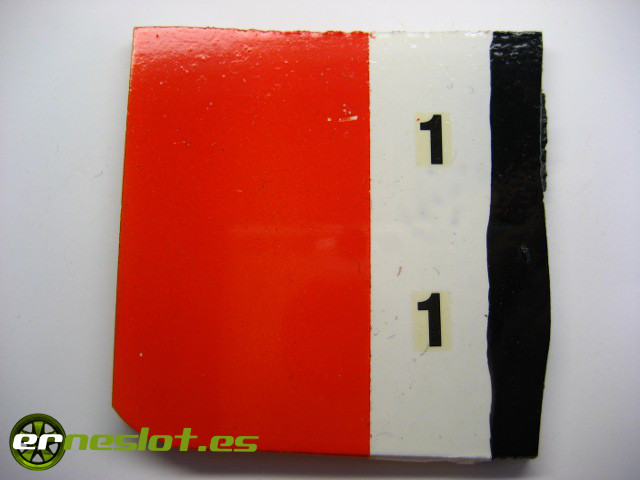
The biggest problem I found with this varnish is who turns yellow a lot when dry, whether previously applied "Bosque Verde" or not, and that is a very serious problem when varnished white cars because the result is disastrous. For other colors, especially dark, can not be a problem, but for white or very light colors I completely advise against (a light blue car can become pastel green "magically").
Regarding the advantages, is a very friendly paint decoration and very resistant to scratches, in fact, in a previous slot car decoration, I didn´t let the paint to dry completely, I manipulated the body early and left my finger print in the paint still soft... I removed the marks with a cotton cloth dampened with water rubbing in circular motions. The marks disappeared and the varnish did not lose shine, and of course, the decoration remained in place. - "Bosque Verde" + Duplicolor bi-layer: Reacts badly with the "Bosque Verde" as seen in the upper half of the plate in the photos below, even to change the color of acrylic and rinse a lot. The surface is with a kind of "orange peel" look less evident in the white (spray acrylic) but exaggerated if the paint is enamel (black), the decal is not affected by the impact but the paint is in bad condition. Advice against this combination of varnish. In the lower half of the plate, where only applied two thin coats of varnish because I had bad experiences with it, the results are pretty good. Is respetful with acrylic paint, although there is a small orange blur in the cut between the orange and white paint. Doesn´t affect to the spray paint and enamel at all and the decals were ok too. The finish is good, but not so fine and homogeneous as in Vallejo, especially if the paint is acrylic. Perhaps with a third coat a little bit loaded would be better, and the coating hardness is proven, which is used in garages to protect bodywork of the cars once painted.
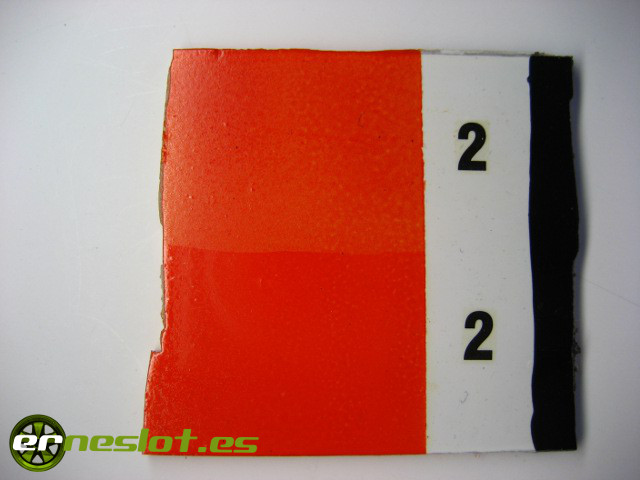
Duplicolor has in its product portfolio this varnish (targeted at automobile industry) and a varnish in the "Aerosol Art" series, which as I have understood is a little less aggressive with the paint (and I guess less resistant), but I can assure nothing.
In previous tests I had very bad results with this varnish because it drag the painting and decoration, the problem was that loaded a lot of varnish the firsts coats. Ideally, we must apply a pair of slim varnish coats, letting dry thoroughly between them, and if we want, a third one to finish the job. The orange peel effect that I have seen in testing can go away with another more loaded coat of varnish but advice against this combination of varnishes for any type of paint. But if you like the risk... - "Bosque Verde" + Citadel satin: The surprise of the tests. To date I only had used to varnish a poor quality synthetic enamel with very bad results, the decals were not affected but the painting, once dry left a "precious" porcelain effect so I hadn´t hopes of obtain good results, but it was not like that.
The Citadel varnish practically not interacts with the "Bosque Verde", maybe a very slight, almost imperceptible "orange peel" effect, more evident when the paint is enamel base than with acrylic paint or spray. Applied directly to the paint the result was almost the same but without the slight "orange peel" effect that said, do not appreciate blur edges between the paints or anything like that. The waterslide decals weren´t affected by the coating at any time and the gap between them and the paint is very small. The finish is very fine and homogeneous, leaving a very nice satin finish that can be interesting for some models, especially if we decorated with "dirty" effect or "end of race" but is less resistant varnish that above, which does not mean to jump easily and I used to varnish a racing slot car and last perfectly the use.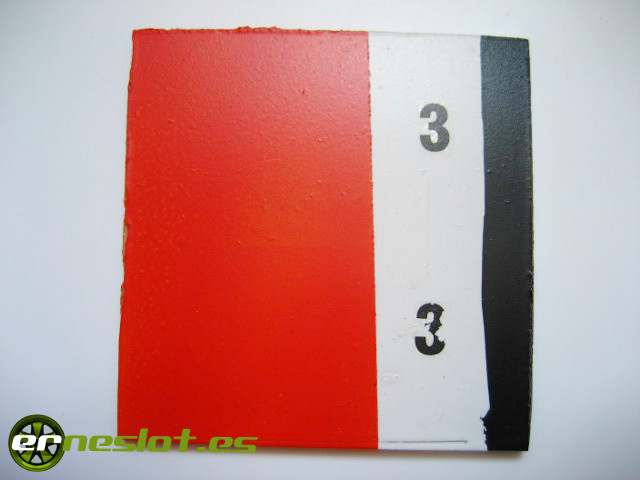
In short, an interesting varnish to give a different finish to our models and is very respectful with the decor. Nice.
In addition to the spray varnishes, I wanted to test a varnish that I bought at a paint store, Titanlux "Acualux " acrylic varnish, looking for a more resistant replacement for the "Bosque Verde". Titanlux acrylic varnish is a dense water-based varnish, in fact the manufacturer recommends diluted with water about 20-30%, which poses many problems when applying. I wanted to test the results by applying it to paint brush and airbrush in different solutions. Let"s see the results of the tests:
- Applied undiluted by paint brush: In the next photo you can see the result:
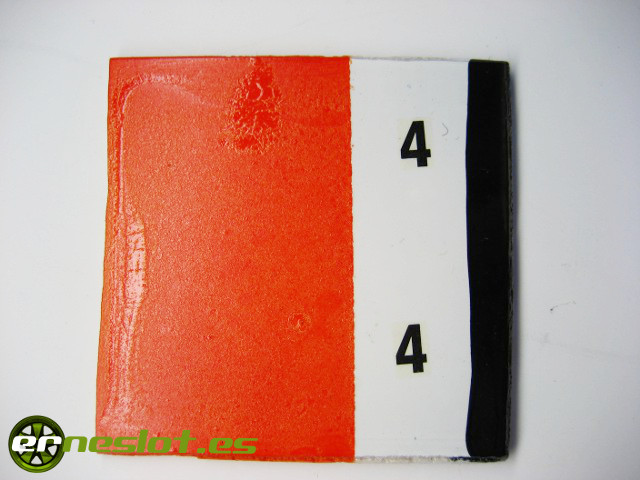
Straight from the pot, and undiluted covers very bad the surfaces. It is so thick that it tends to accumulate in some areas and away from others with the effect seen in the photo. Although it does not attack any paint, decals greatly softened, even rose a bit, but when dry stay in place. Logically, this has happened on a horizontal surface, so the decal could not slip, I don´t think the result would have been the same if the surface had been vertical, such as the side of a car. Conclusion: you can not use it as it comes from the pot. - Applied by paint brush diluted with water: The results were also bad but not so raw. The problem is that the strokes are very noticeable and doesn´t dissapear as it dries, opposite to what happens with the wax coating "Bosque Verde".
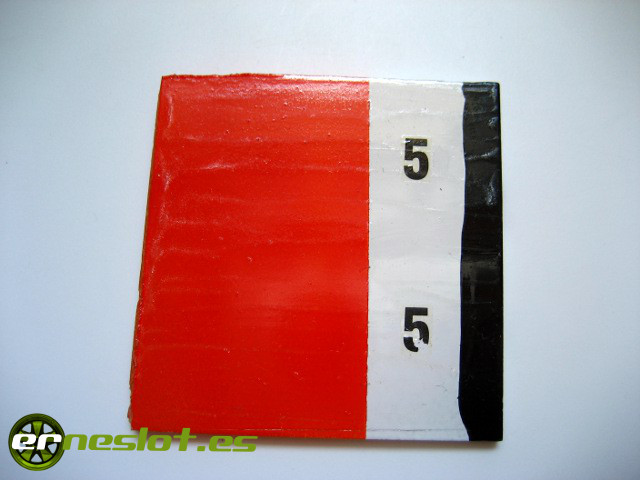
Again, except for special cases, advise against the use of the coating in this way. - Diluted spray gun applyed (approximately 20% water): : Applied in this way the results are beginning to be more satisfactory.
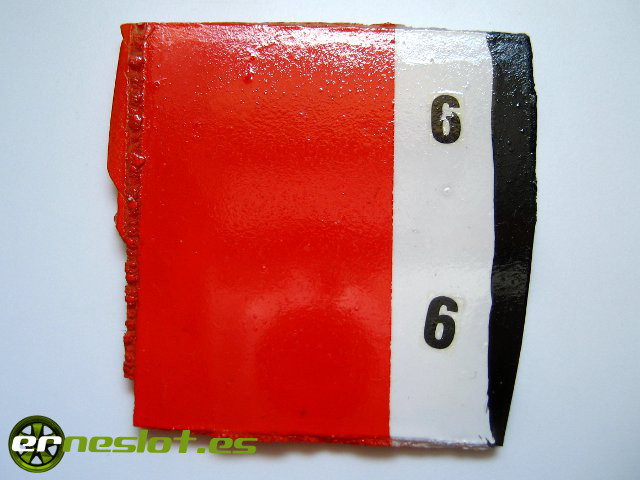
After various tests of dissolution of the varnish with water, tried to apply with a spray gun diluted with 20% of water. I used the spray gun because it can be used with more dense liquid than an airbrush, in fact, to varnish with this solution I left the shutter completely open and still cost him to throw the varnish, and it shows in the final result. As in the previous two cases, did not affect at all to the different types of paint, but the decals, giving the feeling that softened up a little but once dry stay in place. The finish is good although the effect of "orange peel" is evident, probably due to the density of varnish, making it necessary to dilute it more. The brightness is very good and hardness too. Is a very tough varnish but has the disadvantage of its density. - Diluted spray gun applyed (approximately 40% water): Now the results were much more satisfactory. The spray gun pulled the varnish more smoothly and greatly felt in the final result without affecting either the brightness or hardness of the varnish, although only give a hand, once dry, the varnish could scratch without fear and the decor remain intact. For all other respects, the results are the same as in the previous case.
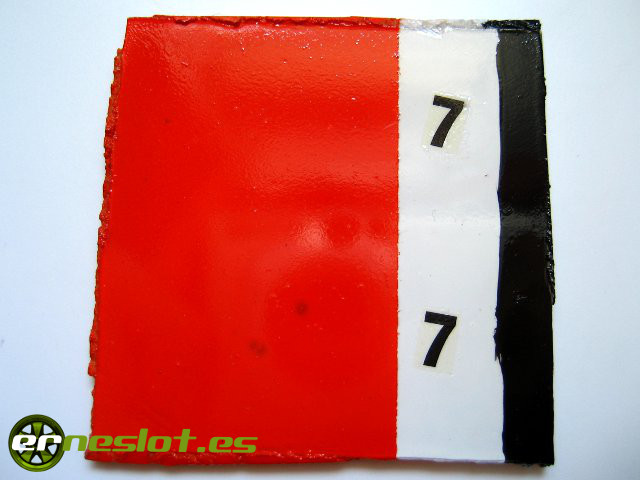
I had high expectations for this varnish and have complied in part, is delicate with the painting but not with the decals, at least with these Team Slot ones, which incidentally, were not in very good condition. It has a great brightness and hardness when dry but it is difficult to apply because of its density. I´ll keep trying it because these early results are quite promising.
To end the matter a few clarifications:
- All varnishes turn yellow. Some much (Vallejo spray) and others less (Duplicolor), some very early and with certain paints (Vallejo spray) and other longer term (Tamiya spray). Even the most sensitive varnishes, such as the "Bosque Verde" leave a light yellow trace.
- Although I haven´t tested in this battery, another option is Tamiya spray varnish. I´ve used both for enamel paint to acrylic paint. For the enamel works well, doesn´t attack the decals but gets rather yellow over time. For the acrylics, the result was bad, although of being of the same manufacturer, attacked the paint and broke my job. It is very resistant to shocks like the other coatings tested (except the "Bosque Verde").
- Acrylic Vallejo spray varnish is so far the best choice you can do except to varnish white cars. Respectful with the decals and paint if we don´t load much the firsts coats. With two coats is enough, but if we apply three, the first and the second must be very light and the third more loaded, always waiting one day between coats. Once the last coat applied allow to dry thoroughly, two or three days at least.
Anyway, the world of varnishes is wide. Here only speak from my experiences with which I used, but on the market there are plenty of them that can give good results, only you must test them. So you know, the test never in the bodyshell that you worked hard to decorate, better test on a useless one and see the results.
Go to topWINDOWS DECORATION
The devil is in the detail. I have said many times, the difference between a normal work and a good work is often in small details, open an air intake in the body, the gums of the windows well defined, a clear cut between two colors of the paint of the body, or for example painting the edges of the windows, which is what I am going to deal with next.
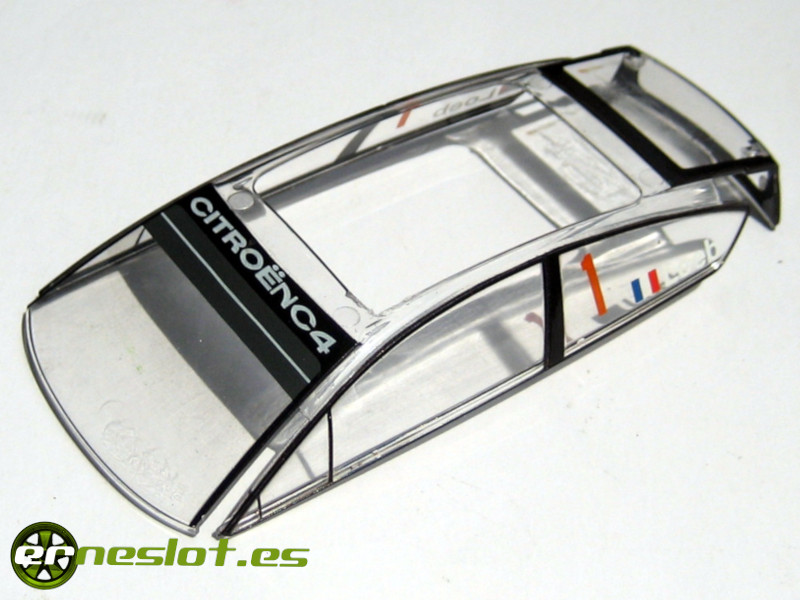
Normally the already decorated cars, apart from the body, have the edges of the windows painted in black, marking the gums and the dark shades of the tinting. As an example, this is the glass from a SCX Citröen C4.
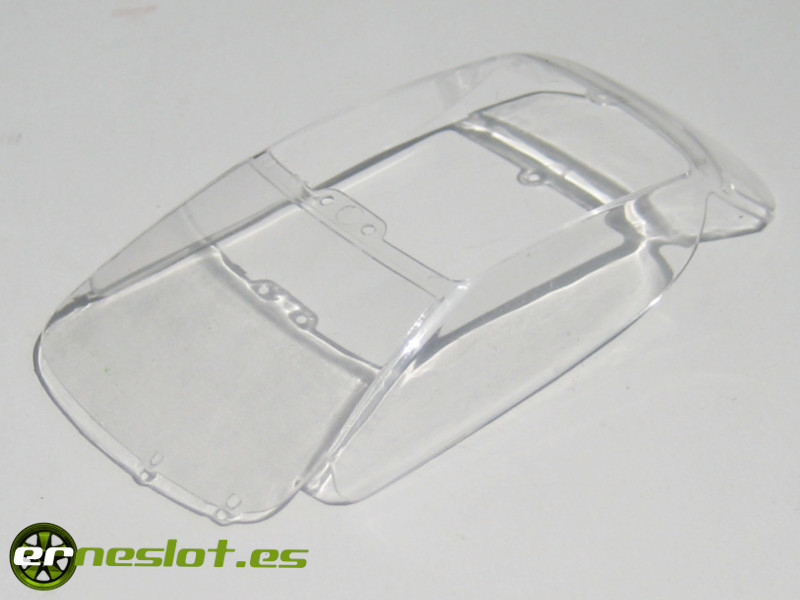
But when we make a slot car starting from a mounting kit, both the body and the rest of the components come without any decoration, including the windows, which can be of a single piece or of several, but always injected in transparent plastic, As you can see in the following image (glasses from the Avant Slot Peugeot 207 white kit).
Personally, I do not like how look a completely transparent windows in a decorated car. It gives the impression that the decoration is unfinished, and although making the black edges is not particularly difficult, to achieve good results we will have to be a little careful, because the defects in this type of work are especially evident.
We start from a window that we want to decorate, it can be the transparent window of a kit or a glass that has lived better times and we want to give it another aspect, such as the following:
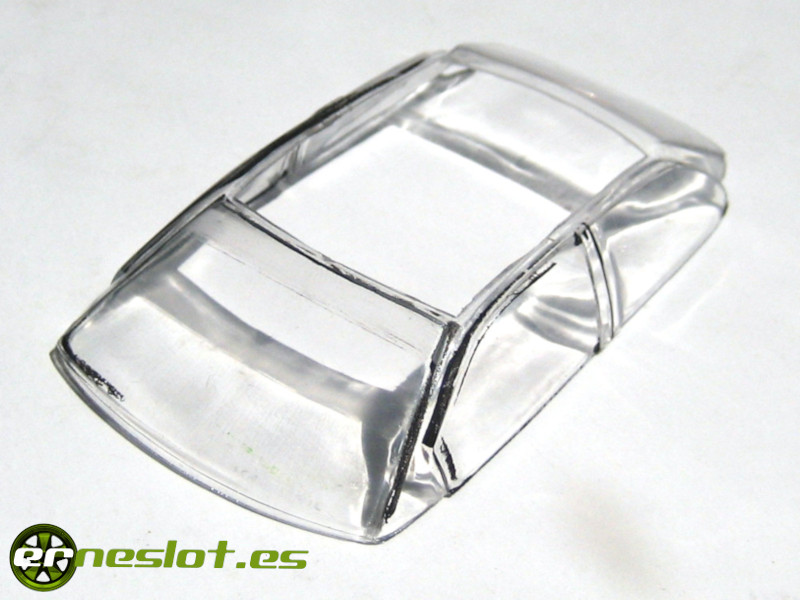
If we want to do a good work we have to achieve that the edges are perfectly sharp and straight, like in the windows of cars, so that unless we are artists of the paint brush, which I am not, the ideal is to mask them and paint with the airbrush.
In the 1/24 scale models, some templates of adhesive paper are usually included to mask the windows and to be able to paint in black easily, but in our cars we will have to do them ourselves. For this, first I make some templates with transparent plastic, for example the plastic of some blister or the plastic to make transparencies. Especially useful are the screen covers of tablets and smartphones, since they adhere to the surface, so that they do not move during the process, but they are also easy to remove without leaving any remains. We place a piece of the chosen plastic over the window and with an indelible marker we mark the outline of the mask, trying to define it as well as possible both when drawing it and when trimming it. Anyway, when it comes to plastic sheets, if their shape isn´t correct we can adjust it better by sanding where necessary.
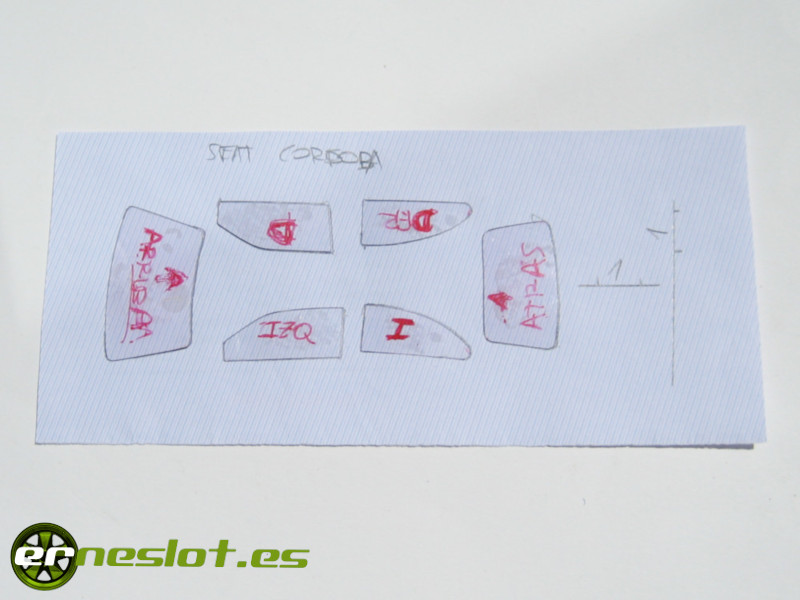
When I have the templates cut out, I paste them on a graph paper (ideally) on some paper with marks of measurements for its correct scaling and I scan them to finish outline them on the computer with Corel Draw, which is the vectorial design program with which I work although any other program of the same type would work fine. The proper shape of each mask is achieved by the trial and error method. I draw the contour of the masks and print them in a normal and ordinary folio. Then I check on the window if the size and shape is correct and correct where necessary. I reprint and check again. When I have perfectly defined the masks for each window, I save the file for later impressions and print the masks on adhesive paper. I use a few sheets of DIN A4 size adhesive paper where I can print all the masks I want. When I have them printed, I cut them out.
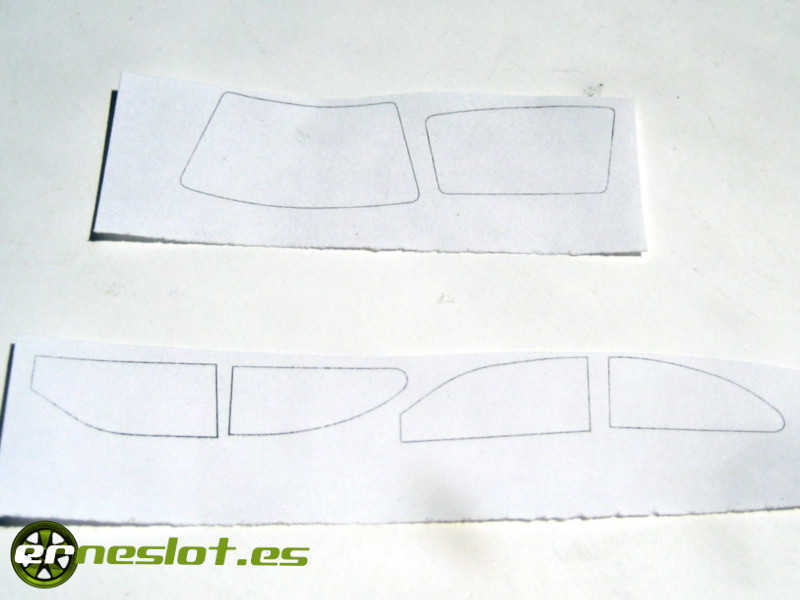
Once cut, I put the masks on the windows, making sure they are well placed. The adhesive paper that I use is quite good and if a mask is badly placed it allows me to easily remove it and put it back in the correct position without losing adhesion strength, although with a little practice it is easy to place the masks correctly on the first attempt.
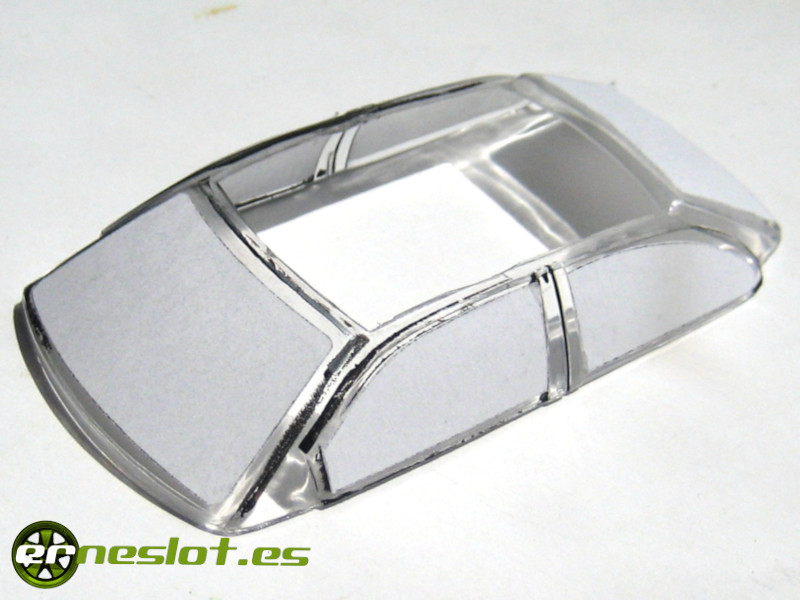
With the masks pasted we proceed with the painting process. I do it by painting with the airbrush with matt black Humbrol enamel (Humbrol ref. 33). I have tried with black matt XF-1 Tamiya acrylic and the result is much better with the Humbrol enamel, which is also much more resistant. Cover with tape to mask the top of the crystals to prevent paint from seeping inside. We could also put masking tape on the inside, but if we are careful with the airbrush we do not stain anything inside, but you could put tape to avoid problems. When we have covered the parts that we do not want to paint we give a homogenous coat of matt black enamel with the airbrush, without fear. Once applied, and without waiting for the paint to dry, remove the tape and masks.
- Pulling the masking tape carefully can be removed without problems. Be careful not to touch the painted parts and leave our mark. Our footprint must be the work itself, not a fingerprint marked in the painting. We can help us with a pair of tweezers or small pliers to remove it more safely.
- Adhesive paper masks are somewhat more complicated to remove. With the tip of the cutter we scratch in a corner until the adhesive paper is lifted a little and without touching the painted part we carefully pull the paper with a pair of pliers or a small pliers until it is completely removed. There may be traces of the paper or the cut of the paint in some places is not all good. Nothing happens, small defects will be corrected when the paint dries.
Once the masks and tape have been removed, the work may have been perfect and we may have a smile from ear to ear or we may have some things to fix, such as:
- If the adhesive paper had left some traces or the adhesive of the masking tape stuck to the glass, we will carefully remove it using a cotton swab or a toothpick moistened in 96° alcohol, taking care not to touch the painted parts. Scratching with a little care we will easily remove the remains without damaging the plastic.
- If a cut has not been well defined, we can define it by passing a stick moistened in alcohol of 96° removing the excess paint or defining a straight line, for example. Do it without fear, the alcohol doesn´t affect the enamel if the coat is thick enough, something that does not happen with acrylic paint, since it is diluted as soon as the alcohol touches it and does not allow these corrections to be made. Due to the hardness ot the toothpick, allows us to go "clearing" with precision all those defects that have remained.
- If we have not masked properly and some of the paint has been deposited on the inside of the glass we will moisten a piece of cotton cloth in 96° alcohol and rub gently until all the paint that has soiled our work is removed.
- If for any reason the work has gone bad and we have to remake it again, we can immerse the glass completely in 96° alcohol and rub with a cotton cloth. The enamel (at least the Humbrol) will be removed and we can start the work again until we get it right.
After removing carefully masks and tape and having made the appropriate corrections, if necessary, we will have something similar to this:
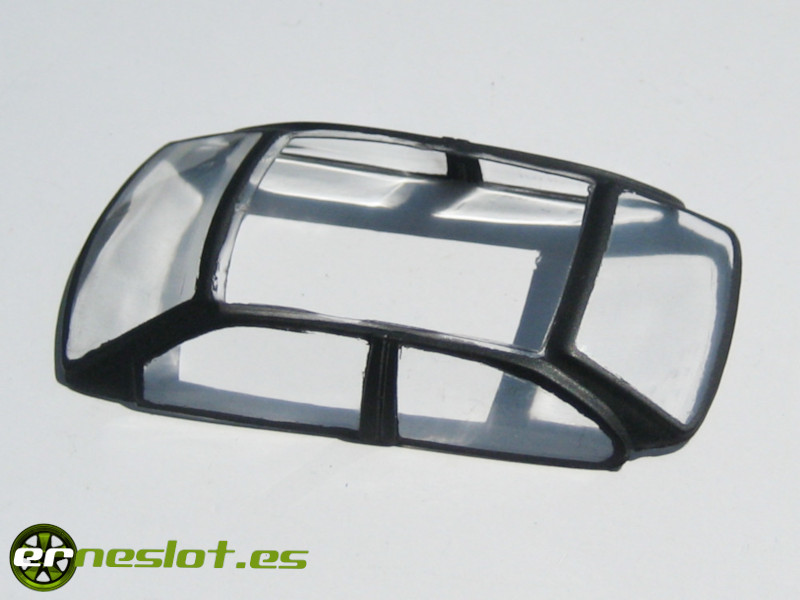
And after waiting a couple of days for the complete drying of the enamel, we will have the lines of the crystals perfectly marked. If we wanted to make a parasol, we would only have to mask the corresponding part and paint it with the airbrush with acrylic paint of the corresponding color.
Through the previous process we get to paint the windows on the outside, that´s why I chose the matte black color, since it gives a much more real look, but we can give another effect to the windows if we paint them on the inside, as is usual to do with the 1/24 scale models. In this way the edges of the glass will have a satiny effect when viewed from the outside and the rest of the paint will not move from its place as the glass itself will protect it. The process is exactly the same as the previous one but painting inside, but the effect is very different. I only use it with 1/24 scale cars but it can be done with cars of any scale, you can even combine the two techniques to achieve very interesting effects, although for slot cars it does not make much sense, it would be more for static scale models. This is how I painted the windows of the Porsche 911 of the Targa Forio or the 1/24 scale Tamiya Subaru Imprezza that appears in the following images:
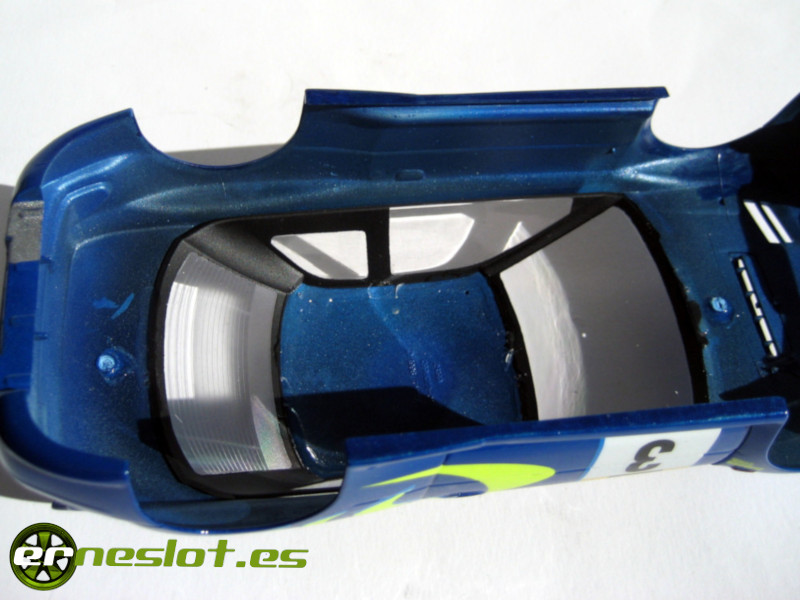
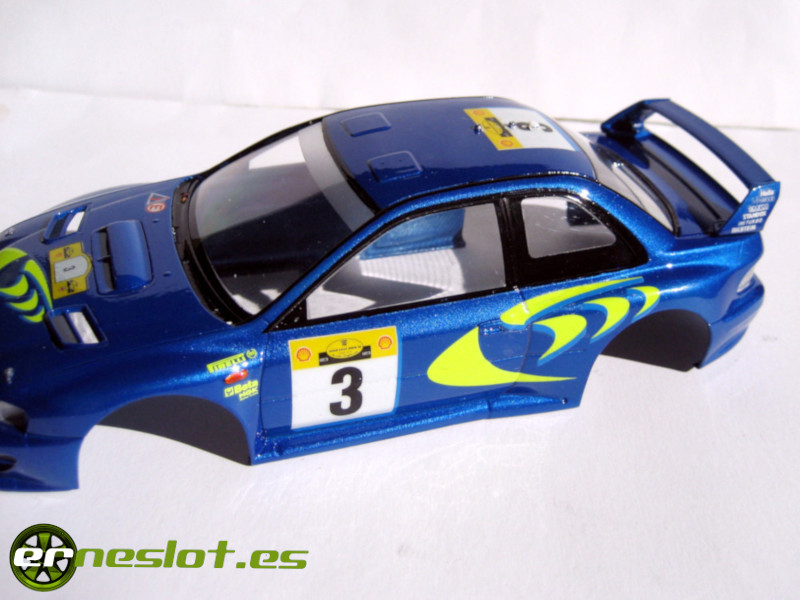
In this way we can get some windows that give a much better finish to our slot cars and allow us to reach a point more in the detail of our cars, if that is what we want.
Go to topFortnightly updates, new cars and more in www.erneslot.es


